


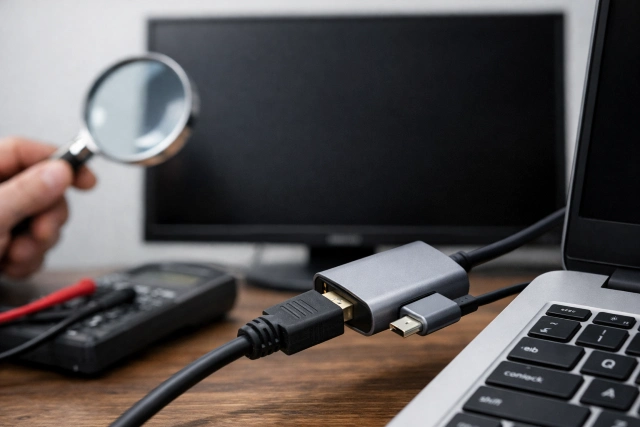
You plug in your adapter, connect the HDMI cable, and… nothing. No picture. Sometimes the monitor flashes for a second and goes dark. Other times it stays black like it never got the message. If you’re dealing with a black screen using Type C to USB and HDMI, you’re not alone, and the good news is that most causes are fixable with a calm, step-by-step approach.
- Quick reality check: what “Type C to USB and HDMI” actually does
- Fast checklist overview (start here if you’re in a hurry)
- Step 1: Confirm your device can output video over USB-C
- Step 2: Identify what kind of adapter you’re using (it changes everything)
- Step 3: Do the “clean reconnect” the right way
- Step 4: Swap the easiest parts first (cable and display)
- Step 5: Use this table to pinpoint the likely cause
- Step 6: Windows fixes that solve most black screens
- Step 7: macOS and iPadOS checks (especially with multiport adapters)
- Step 8: The cable problem nobody wants to believe
- Step 9: Fix “detected but black” by adjusting resolution, refresh rate, and color settings
- Step 10: Power delivery and “black screen when USB devices are connected”
- Step 11: If your dock uses DisplayLink, treat it like a driver problem first
- Step 12: Real-world mini case studies (what usually fixes it)
- FAQ: quick answers people actually need
- Conclusion: Get systematic, and Type C to USB and HDMI stops being a mystery
This article gives you a practical checklist that works for laptops, tablets, and phones, across Windows and macOS, and with common setups like hubs, docks, and USB-C multiport adapters. We’ll cover the real reasons Type C to USB and HDMI can fail (port capability, cable limits, display modes, drivers, HDCP, and power) and how to isolate the exact weak link without guessing.
Quick reality check: what “Type C to USB and HDMI” actually does
Before troubleshooting, it helps to understand one thing that trips up a lot of people: USB-C is a connector shape, not a promise of video.
A Type C to USB and HDMI adapter can only show video if your device’s USB-C port supports video output, usually via DisplayPort Alternate Mode (often written as DP Alt Mode) or Thunderbolt on many laptops. If the port only supports charging and data, you can still charge a phone or transfer files, but HDMI video will stay black. Dell states this clearly when explaining why some USB-C monitor ports show no video: the USB-C port must support DP Alt Mode (or be Thunderbolt), otherwise you’ll see no image.
VESA and USB-IF created standards for DisplayPort Alt Mode over USB-C, defining how video can be carried over the USB-C connector when supported.
So yes, your adapter might be fine. The device port might be the limitation.
Fast checklist overview (start here if you’re in a hurry)
If Type C to USB and HDMI gives you a black screen, run these in order:
- Confirm the monitor is on the correct input (HDMI 1 vs HDMI 2) and not muted by a power-save mode.
- Reseat connections in the right order: unplug everything, then connect HDMI to monitor, then adapter to device, then power (if the adapter supports pass-through charging).
- Test with a different HDMI cable and a different monitor or TV (to eliminate a bad cable or picky display).
- Confirm your USB-C port supports DP Alt Mode or Thunderbolt (device specs matter here).
- On Windows, force display mode and detection (Project menu and display settings). Microsoft’s monitor troubleshooting guide starts with these basics for external displays.
- Update or reinstall graphics drivers and dock drivers (especially if your dock uses DisplayLink).
- Check power: try connecting a charger to the adapter’s PD port, or use a powered dock.
- If it works on another device but not yours, suspect OS settings, drivers, or firmware.
- If it works for 10 minutes then blacks out, suspect cable quality, refresh-rate mismatch, dock firmware, or sync loss. Dell documents intermittent blanking scenarios with some docks and suggests cable checks among the first steps.
Now let’s do this properly, like a clean diagnosis instead of random swapping.
Step 1: Confirm your device can output video over USB-C
This is the most important step because it determines whether Type C to USB and HDMI is even possible on your hardware.
How to verify video support (without guesswork)
Check one of these:
- Your device’s official specs for “DisplayPort over USB-C,” “DP Alt Mode,” “Thunderbolt,” or “USB-C with video out”
- A small DisplayPort “DP” icon near the USB-C port (not always present)
- Manufacturer docs (laptop, tablet, or phone support pages)
If you have a Dell monitor or dock scenario, Dell’s guidance is direct: if your USB-C port only supports data or power delivery, you will not get video.
If the port lacks video support, a simple adapter will not fix it. You would need an alternate solution like a DisplayLink dock (USB graphics), which is a different category of product and works through software drivers.
Step 2: Identify what kind of adapter you’re using (it changes everything)
Not all Type C to USB and HDMI gear is the same. Knowing which one you have makes troubleshooting faster.
Common adapter types
- Simple USB-C to HDMI adapter
- Relies on DP Alt Mode or Thunderbolt from your USB-C port
- No drivers typically required
- USB-C hub or multiport adapter (HDMI + USB-A + PD charging)
- Still relies on DP Alt Mode or Thunderbolt for video
- Adds power negotiation and additional devices that can introduce quirks
- Docking station (some are DP Alt Mode, some are DisplayLink)
- DisplayLink docks require drivers and behave differently
- If the dock is DisplayLink, video is software-driven
DisplayLink themselves note that blanking or flicker can be tied to the monitor losing sync, and they recommend checking and replacing video cables as an early step.
If you’re not sure whether it’s DisplayLink, check the product page or device manager on Windows for DisplayLink components.
Step 3: Do the “clean reconnect” the right way
This sounds basic, but it fixes a surprising number of black screens with Type C to USB and HDMI, especially on hubs with pass-through power.
The correct reconnect order
- Unplug the adapter from your device.
- Unplug HDMI from the adapter.
- Turn the monitor off, wait 10 seconds, turn it back on.
- Plug HDMI into the monitor first.
- Plug HDMI into the adapter.
- Plug the adapter into your device.
- If your adapter supports charging, plug in your USB-C charger last.
Why this order helps: many adapters negotiate capabilities when they first connect. If the monitor is asleep or the cable handshake fails at that moment, you can get a black screen even though everything looks connected.
Step 4: Swap the easiest parts first (cable and display)
Before you dive into drivers and settings, eliminate the simple failures.
Swap test plan
- Try a different HDMI cable (preferably one you know works).
- Try a different HDMI port on the monitor.
- Try a different monitor or TV.
- If possible, try the same Type C to USB and HDMI adapter on another laptop or phone.
If it works on a different display, your original monitor might be picky about resolution, refresh rate, or HDCP. If it fails everywhere, suspect the adapter or the device port.
Step 5: Use this table to pinpoint the likely cause
Here’s a quick diagnosis map you can use mid-troubleshooting.
| What you see | Most likely cause | What to try next |
|---|---|---|
| Monitor says “No Signal” | Wrong input, handshake failure, cable issue | Check input, reseat, swap HDMI cable |
| Black screen but monitor detected in OS | Unsupported resolution or refresh rate | Lower resolution, set 60Hz, disable HDR |
| Works then goes black intermittently | Cable quality, dock firmware, sync instability | Replace cable, update dock firmware, test another port |
| USB devices work but HDMI never works | USB-C port lacks DP Alt Mode | Confirm specs, try DisplayLink dock alternative |
| Works on another laptop but not yours | Driver, OS display mode, firmware | Update GPU drivers, check display settings, update BIOS/firmware |
| iPhone or iPad shows nothing in certain apps | App limitation or HDCP behavior | Review Apple adapter guidance on app compatibility and alerts |
Step 6: Windows fixes that solve most black screens
If Type C to USB and HDMI is connected but you’re staring at darkness on Windows, these steps handle the most common software-side issues.
6A) Force the correct projection mode
Windows sometimes defaults to “PC screen only,” especially after sleep or docking changes.
- Press Windows key + P
- Choose Extend or Duplicate
Microsoft specifically recommends using the Project menu (Windows key + P) when troubleshooting external monitor connections.
6B) Force display detection
Go to:
- Settings > System > Display
- Look for a Detect option (varies by Windows version)
If Windows detects the display but shows black, jump to resolution and refresh fixes below.
6C) Reset the graphics driver response
If your system is responsive but the external display is black, a graphics reset can help after driver hiccups or wake issues. (Your screen may blink briefly.)
If you suspect a broader Windows black screen issue rather than only the external monitor, Windows troubleshooting guides often include steps like checking display modes and driver resets as part of the recovery path.
6D) Update or reinstall GPU drivers
Black screen issues with Type C to USB and HDMI can happen after updates or driver changes.
Best practice:
- Update Intel, NVIDIA, or AMD graphics drivers from the manufacturer
- If the problem started right after an update, try rolling back the driver
Microsoft’s external monitor troubleshooting also emphasizes following a structured set of steps when monitors don’t work as expected.
Step 7: macOS and iPadOS checks (especially with multiport adapters)
Apple-style multiport adapters can be reliable, but they also expose you to HDCP and app compatibility edge cases.
Apple’s guidance notes that if an app doesn’t display video or play audio through an adapter, it may be app compatibility related. They also mention alerts related to HDCP-compatible devices in some cases.
macOS quick checks
- Unplug and reconnect the adapter (macOS can renegotiate display mode on reconnect)
- System Settings > Displays: confirm the monitor appears
- Try “Detect Displays” if available (older macOS versions had this option more clearly)
If the display appears but remains black:
- Lower refresh rate to 60Hz
- Temporarily disable HDR
- Try another HDMI cable (macOS can be sensitive to handshake quality)
Step 8: The cable problem nobody wants to believe
Here’s a painful truth: many failures blamed on Type C to USB and HDMI adapters are really cable capability issues, especially on USB-C cables used between the device and the hub or dock.
USB-C cable quality matters more than it looks
Some USB-C cables are “charge-only” or USB 2.0 level for data. They may physically fit but cannot support the bandwidth or signaling needed for reliable display output in certain setups.
USB-IF publishes cable logo usage guidelines and requires USB-C cables in their compliance program to be labeled with data rate and power wattage logos. Those markings help identify what the cable is designed to support.
A practical point from an engineering-focused USB-C explainer: many Type-C cables beyond the simplest configuration include an E-Marker chip that identifies cable capabilities during USB Power Delivery negotiation.
What to do right now
- If you’re using a USB-C cable between your device and a dock, swap it with the original dock cable.
- If you’re using an unknown USB-C extension, remove it.
- If your hub has a built-in USB-C plug, focus on the HDMI cable instead.
For intermittent blackouts, Dell’s dock troubleshooting for blanking includes cable checks as a primary action.
Step 9: Fix “detected but black” by adjusting resolution, refresh rate, and color settings
This is one of the most common patterns with Type C to USB and HDMI:
- Your laptop sees the monitor
- You can even drag windows over (sometimes)
- The monitor stays black, flickers, or shows “Out of Range”
Try these safe settings first
On Windows:
- Set resolution to 1920×1080
- Set refresh rate to 60Hz
- Turn HDR off temporarily
- If available, set color depth to 8-bit
On monitors:
- Disable “overclock” or high refresh mode
- Turn off special gaming modes temporarily
- Try a different HDMI input (some are limited)
If the picture appears at 1080p but not at 4K, the issue might be:
- HDMI cable bandwidth
- Adapter limitations
- Dock limitations
- Monitor HDMI version differences
For new HDMI spec changes and cable certification programs, HDMI.org provides official spec overviews and cable guidance.
Step 10: Power delivery and “black screen when USB devices are connected”
If your hub includes USB-A ports and you’ve plugged in power-hungry devices (external drives, RGB keyboards, capture cards), you can starve the adapter or the USB-C port’s power budget.
Signs you have a power problem
- HDMI works until you plug a USB device in
- HDMI flickers when the laptop battery is low
- The adapter feels unusually warm
- Charging stops while HDMI is connected
Fixes
- Plug your charger into the hub’s PD input
- Use a higher-wattage charger if supported
- Remove high-power USB devices and test again
- Try a powered dock (with its own power supply)
Even when the video signaling is correct, unstable power can break the handshake and leave you with a black screen on Type C to USB and HDMI.
Step 11: If your dock uses DisplayLink, treat it like a driver problem first
DisplayLink docks are popular because they can add more displays even when a port lacks DP Alt Mode, but they are software dependent.
DisplayLink’s own troubleshooting notes that intermittent blanking can be tied to the monitor losing sync, and they advise checking video cables among the first steps when output is not working as expected.
What to do
- Install or update the DisplayLink driver from the dock maker or DisplayLink
- Reboot after installation
- Test one monitor first, then add the second
- Disable USB selective suspend on Windows (advanced, but can help some setups)
If a DisplayLink dock works on another computer but fails on yours, it’s almost always drivers, OS permissions, or power management settings.
Step 12: Real-world mini case studies (what usually fixes it)
Case 1: “My USB devices work, but HDMI is always black”
Outcome: USB-C port did not support DP Alt Mode. Charging and data still worked, which created false confidence. The user needed either a different port (Thunderbolt) or a DisplayLink-based solution. Dell’s guidance matches this exact scenario.
Case 2: “It works for 10 minutes, then the screen goes black”
Outcome: Cable and sync stability issue. Swapping to a higher-quality HDMI cable fixed it. This aligns with both DisplayLink’s advice about sync loss and Dell’s dock blanking troubleshooting starting with cables.
Case 3: “It works on my friend’s laptop but not mine”
Outcome: Windows display mode and driver mismatch. Forcing Extend mode and updating graphics drivers solved it, consistent with Microsoft’s external monitor troubleshooting flow.
FAQ: quick answers people actually need
Why does Type C to USB and HDMI work for charging but not for display?
Because charging and data can work on USB-C ports that do not support video output. Video requires DP Alt Mode or Thunderbolt, and without that capability, HDMI output stays black.
Why does the monitor show “No Signal” even though everything is plugged in?
Usually it’s one of these: wrong monitor input, cable handshake failure, adapter not negotiating correctly, or the USB-C port not supporting video. Start by checking the monitor input and swapping the HDMI cable.
Can an adapter support 4K but still show black at 4K?
Yes. It can “support” 4K in marketing terms but fail in practice due to cable bandwidth, refresh rate, HDR settings, or compatibility quirks. Try 1080p at 60Hz to confirm the pipeline works, then increase settings gradually.
Do I need special drivers for Type C to USB and HDMI?
Most simple adapters do not. But DisplayLink docks do require drivers, and without them you may get a black screen or missing displays.
Conclusion: Get systematic, and Type C to USB and HDMI stops being a mystery
A black screen feels dramatic, but troubleshooting Type C to USB and HDMI is usually just detective work. Confirm your USB-C port supports video (DP Alt Mode or Thunderbolt), do a clean reconnect, swap HDMI cables and displays, then move into OS-level fixes like projection mode and driver updates. Official guidance from Microsoft and hardware vendors repeatedly points back to the basics: correct display mode, reliable cables, and verified compatibility.
Once you understand that the USB-C connector is a shape and not a guarantee, Type C to USB and HDMI problems become much easier to solve. Keep a known-good HDMI cable around, avoid mystery USB-C cables, and when in doubt, confirm the port capabilities in your device specs. That simple habit saves hours.
If you want one helpful reference to understand the connector itself, the USB-C connector overview is a good starting point.


